
June 2023 Danish Cord Stool
By Larry O'Flynn
By Larry O'Flynn

My Review of a Woodworking Kit purchased from Lee Valley Woodworking kits can be useful educational tools which allow the woodworker to learn a new skill. Lee Valley offers a few kits and the
Danish Cord Stool recently caught my eye. I thought it would be interesting to learn how to weave a seat using Danish cord: a material made from paper that is surprisingly durable.
The skill level according to Lee Valley is Beginner to Intermediate which is on target. They state the completion time as 7 to 12 hours plus glue curing time. My experience required a bit more time as I felt a greater extent of sanding was needed and I selected my own pace for the weaving process.
The kit comes with most of the materials to complete the project other than typical items most have in their shop (drill, hammer, tape measure, etc.). There is a Contents List which also contains a link to an online article with in-depth instructions as well as a video demonstrating the weaving process.
The wood pieces are Ambrosia maple and the instructions are informative in describing how this wood gets its unique coloration as the result of an infestation by the wood-boring Ambrosia beetle and a fungus this beetle introduces to the wood - useful background for a new woodworker. The pieces are supposed to be cut to size with mortises already cut. Upon assembly with the supplied floating tenons the basic frame is constructed. Perhaps my wood pieces were cut on a Friday afternoon as I noticed variation in the dimensions. The legs were supposed to be 1 1/4 “ by 1 1/4 “. I had one leg with those dimensions but I measured one being off by 3/32”. The surface finish had the usual milling marks one gets from dimensioning lumber (blade marks, some tear out, scalloping from the thickness planer, and burning along the edges likely due to a duller blade). As a result, I spent a bit more time on the sanding to get a satisfactory product.
When gluing up, they recommend holding the joints with masking tape while the glue cures. I used clamps.

Assembled Frame of the Stool

Ambrosia (Wormy) Maple with charateristic fungus coloration
Five of the 16 joint matings with the legs resulted in a flush surface while all other rail connections were proud of the leg surface with the most proud joint being off by 3/64” (about four playing card thicknesses). These fittings were all dependent in the cutting of the mortises from the outside surface. To get a flush meeting between the rail and the leg is challenging. A design change to eliminate this problem would be to cut the mortise in the leg such that when the rail is joined there is a small reveal to the leg. A finish of beeswax polish (included in the kit) is applied to the frame and buffed. After layout for the nail placement in the rails and hammering in the L-shaped nails. The weaving process begins.
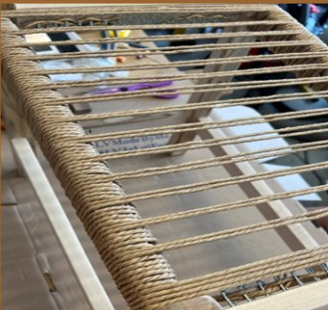

Weaving occurs in three stages: the warp ties the front rail to the back rail. Wrapping wraps the space between the warp strands on the front and the back rail. The weft runs the cord between the side rails and is the most time-consuming. It is important to keep the cord straight and to avoid twists. Many nails needed to be hammered deeper as they worked loose from the wood. I ended up doing the weaving section in several stages in order to give my fingers a break.
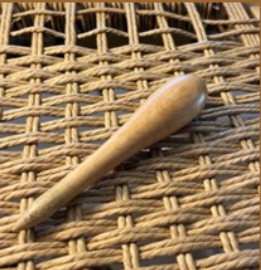
In addition to using a screwdriver to help to keep the rows
straight, I also used a fid (shown in picture) to help which was much easier on my fingertips. The close spacing of the nails on the sides and my large fingers led to some challenges during this stage. Taking my time and sometimes undoing what had been done to correct an error eventually allowed for a finished product.
straight, I also used a fid (shown in picture) to help which was much easier on my fingertips. The close spacing of the nails on the sides and my large fingers led to some challenges during this stage. Taking my time and sometimes undoing what had been done to correct an error eventually allowed for a finished product.
The project was fun. The accurately cut 90- degree mortises allowed the floating tenons to pull a tight no-gap joint together. Although some of these joints were slightly proud at the surface,the overall look of the project was acceptable. The final product measures 18”x12”x17 1/4” and its convenient size has resulted in my wife using it in her dressing area. For less than $100 the project was a good way to learn about Danish cord weaving and I will likely use this technique on a future project.