
November 2023 Coffee Table
By Sylvia Acosta
By Sylvia Acosta
"After searching for a coffee table but not finding something that I felt would work, I decided to build one. This was only my second furniture project. The first was a small bookcase, so I knew this would be a lot more challenging. I searched online and found instructions for making a coffee table with pallet wood; however, I decided I wanted to use wood that would give the project a more modern look. After deciding on the table size and drawing the diagrams, I went to Dave Keitz (Woodshop Education Chair). Dave was there to help throughout and that was essential to my success. He’s an excellent teacher who has a wealth of knowledge and patience. Whether it was just a matter of proposing a change to the plan or educating me on different ways to chamfer edges, the discussions with Dave were a great learning experience. Along the way, there were others who were there to offer a hand, from offering an opinion about how they would do something, to those who helped me move my project, glue, clamp, and carry it out of the woodshop. There are many experienced woodworkers in the woodshop willing to help and they are an invaluable resource." -Sylvia Acosta
Sylvia, a retired nurse, moved to On Top of the World eight years ago and has been a member of the OTOW Woodshop for two years. This coffee table project is her second woodworking project. Her previous experience with woodworking was limited to high school woodshop.
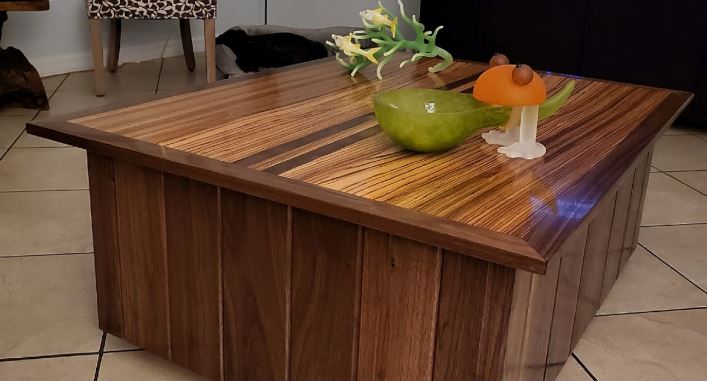
She began this project with plans that called for a 2x4 frame, but abandonded that idea after buiding it. She rebuilt the frame with 2x2s. The hardwoods for the project, zebra wood and walnut were sourced from Woodcrafting Woodworks, Hardwoods on Highway 40. The 2x2s were obtained form a local big box lumber store. To allow for movemen the table top was attached with Powertec z-clips in slots made with the shop's biscuit cutter. The walnut slats for the sides were made with inverted chamfer edges with narrow triangular pieces between the panels. The sides were sanded with to a 220 grit finish, while the top was worked to a 320 finish. A rub-on warm-gloss polyurethane was applied: three coats to the sides and four to the top. An additional four coats of regular semigloss polyurethane was applied to the top to achieve the durable and lustrus finish that can be seen in the photos.
Sylvia, a retired nurse, moved to On Top of the World eight years ago and has been a member of the OTOW Woodshop for two years. This coffee table project is her second woodworking project. Her previous experience with woodworking was limited to high school woodshop.
She began this project with plans that called for a 2x4 frame, but abandonded that idea after buiding it. She rebuilt the frame with 2x2s. The hardwoods for the project, zebra wood and walnut were sourced from Woodcrafting Woodworks, Hardwoods on Highway 40. The 2x2s were obtained form a local big box lumber store. To allow for movemen the table top was attached with Powertec z-clips in slots made with the shop's biscuit cutter. The walnut slats for the sides were made with inverted chamfer edges with narrow triangular pieces between the panels. The sides were sanded with to a 220 grit finish, while the top was worked to a 320 finish. A rub-on warm-gloss polyurethane was applied: three coats to the sides and four to the top. An additional four coats of regular semigloss polyurethane was applied to the top to achieve the durable and lustrus finish that can be seen in the photos.

"As you can see, the end project doesn’t look like the table plan I originally started with. However, it is a table that in my view looks better and really works for my decor."
"Some of the things I learned in completing this project… Starting with the frame as recommended online doesn’t always work out. Being flexible with your plans is very helpful. Chamfer edges help when wood pieces don’t quite match up, and they look good too. When in doubt ask an experienced woodworker what they would do."
"Some of the things I learned in completing this project… Starting with the frame as recommended online doesn’t always work out. Being flexible with your plans is very helpful. Chamfer edges help when wood pieces don’t quite match up, and they look good too. When in doubt ask an experienced woodworker what they would do."
"A quote from a woodworker that stuck: 'It doesn’t have to be perfect you just have to make it look that way.'”